Appearance
Introduction
The Codey repo is setup as a monorepo and uses the following toolchain:
- npm workspaces manages the dependencies between packages and installation of node_modules at root or package level.
- TurboRepo is a task manager for monorepos allowing for rapid task execution respecting dependencies.
- changesets manages the versioning and changelog of all packages.
Setup
Software requirements
Volta
The Codey repo requires node to work properly. We manage the required version automatically using volta. More information about Volta can be found here.
After volta is installed, restart your terminal and the node version will automatically be set correctly when in the codey repo.
Prepare repo
Clone the Codey repo to your git folder:
sh
git clone https://xeriusit.visualstudio.com/Xerius2020/_git/codeyNext we need to install all dependencies:
sh
cd codey
npm i
As a final step run a build to ensure everything works correctly:
sh
npm run buildThis kicks in TurboRepo that will run the build commands in parallel depending on the dependencies. Notice that it will replay input from cache when no changes are detected. You can try this yourself by running the build again after the first run succeeded.
TIP
In a mono repo all commands are run from the root of the repo.
To run a command of a specific package simply type the command and specify the package it should be run from e.g. npm run build:vuepress -w=@xerius/codey-documentation.
This approach should only be used for testing commands as it does not take dependencies into account.
Command Information
The monorepo setup comes with a wide range of npm commands. All commands information and usage workflows can be found in the readme.md file in the root of the repo.
Branching strategy
There are 2 long living branches within the repo:
master: contains the latest production versiondev: contains upcoming features/fixes
Starting development
To start development, create a branch from the latest dev with the following naming conventions:
INFO
Only urgent production fixes should branch from master.
| Purpose | Naming convention |
|---|---|
| Feature | f/{feature-id}-readable-description |
| Story | s/{story-id}-readable-description |
| Bug | b/{bug-id}-readable-description |
| Incident | i/{incident-id}-readable-description |
When taking on multiple items in 1 branch, take the topmost level as branch. e.g. resolving 5 stories should be done in a feature branch.
Development flow
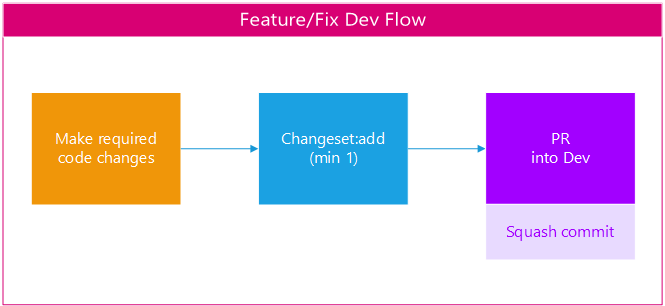
The image above describes the basic dev flow:
- Make the required code changes on a specific branch.
- Add at least 1 changeset (more info in section below).
- Create a PR for review with completion set to squash.
Versioning basics
As mentioned in the introduction, Codey uses changesets to manage our versioning.
The next version number & changelog is based on changesets. These small files, found in .changeset at the repo root, are written in markdown an represent all changes that are not released yet.
To add a changeset use the command npm run changeset:add. Alternatively you can use changeset add when the changeset cli is installed globally.
While adding a changeset, the cli will ask what package should get an update on what level. This follows the semver rules.
Because these are all markdown files, they can be changed afterwards and reviewed in a PR.
As shown on in the development flow, every change should at least have 1 changeset added.
Pipelines
All Codey pipelines can be found here
| Name | Purpose |
|---|---|
| Codey - PR Build | PR Build verification |
| Codey - Build and Publish Package | Builds and publishes all packages to npm repository and CDN when changes are detected |
| Codey - Documentation - Build & Deploy | Documentation Build & Deploy pipeline |
| Codey.General.Pages | Build and Deploy the general pages |